|
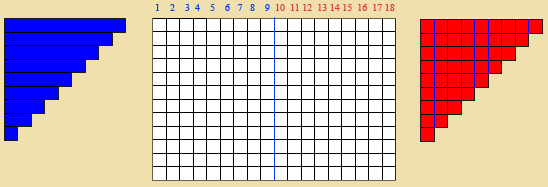
- A board divided into squares (each 2cm x 2cm) across from left to right and 11 squares from top to bottom. The topmost squares are numbered 1 to 18; from 1 to 9 are in blue and from 10 to 18 are in red. There is a blue line that divides the board vertically after the number 9.
- 2 sets of strips, one set is blue with symbols 1 to 9. The other set is red, which are subdivided into squares by blue lines. The end square of each strip is marked with the symbol that corresponds to the number of its squares.
- A set of plain wooden strips (not colored or numbered) progressing in length from the first and smallest strip (2cm x 2cm) by adding one square to its length with each succession strip so that the last strip is 17 square long.
- Chart 1
- Have the child bring the material to the table.
- Show the child the new board. Show the numbers across the top and how number 1-9 are blue and the numbers 10-18 are in red. Tell the child that the red line after the number 9 shows us that we will never have an answer bigger than 9.
- Have the child set up the blue strips and red strips as in the Addition Strip Board.
- Show the child the new blank strips and have the child lay them out in the same way as the blue and red strips to the right of the board.
Diagram shows complete layout of the board, strips, and paper.
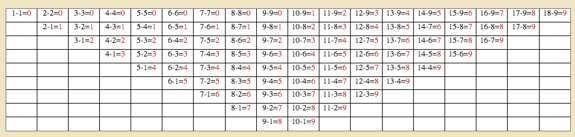
18 – 9 =
18 – 8 =
18 – 7 =
18 – 6 =
18 – 5 =
18 – 4 =
18 – 3 =
18 – 2 =
18 – 1 =
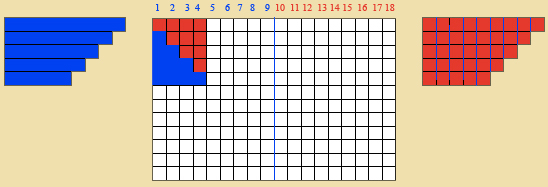
- Tell the child that we must first choose a minuend, such as 9
- Cover up the numbers 10-18 with the blank strip because, “We don’t need those numbers”.
- Then decide how many you will take away from nine.
- Using the blue strips, place the one chosen (such as 5) directly to the left of the blank strip.
- Read, “9 minus 5 is 4.” Point to the 4 directly to the left of the blue strip.
- Repeat a few times until the child understands what to do.
- Introduce the tables written on the paper. Have him read the entire equation (18 – 9 = ). Ask the child what the minuend is. Then do the problem on the chart to find the answer.
- Point out that the answer will be written in blue. You can also point out that this will be the only problem on the page.
- Introduce the next page of the 17 tables.
- Show the child how to cover up the 18 with the correct brown strip and repeat as for the 18 tables.
- Repeat in this manner for all of the tables.
- Once done, the child can check his work with the Subtraction Chart 1.
The child works as in the presentation.
- Have the child bring the material to the table.
- Show the child the new board. Show the numbers across the top and how number 1-9 are blue and the numbers 10-18 are in red. Tell the child that the red line after the number 9 shows us that we will never have an answer bigger than 9.
- Have the child set up the blue strips and red strips as in the Addition Strip Board.
- Show the child the new blank strips and have the child lay them out in the same way as the blue and red strips to the right of the board.
Diagram shows complete layout of the board, strips, and paper.
4 – 0 = 4
4 – 1 = 3
4 – 2 = 2
4 –1 = 3
4 – 4 = 0
- Take a piece of squared paper and write 4 at the top. Look at the top strip (the 4 red strip). Tell the child that you will not take anything away from it. Record the equation 4 – 0 = 4.
- Look at the next combination of strips. Move the blue 1 strip to the bottom. Record the equation 4 –1 = 3.
- Repeat this for 4 – 2 = 2; 4 – 3 = 1; and 4 – 4 = 0.
To give practice in subtraction leading to the memorization of the essential subtraction facts.
The child checks his work with Chart 1.
5 1/2 - 6 years
Share your experiences in the
|